Technical Note: XTN1402
Overview
An archive running XenData Archive Series software may be configured with a fail-over server for additional redundancy. This technical note describes how to configure the system.
Introduction
The fail-over configuration described here employs a fibre channel tape library, an external RAID with fibre channel interfaces and a fibre channel switch. The XenData software is configured to store the XenData state file and XenData log files on the external RAID. The procedure requires that only one of the servers may be powered on at a time.
Server and Switch Requirements
To create the fail-over system, you will need the following:
- Two servers, each running Windows Server 2008 R2 SP1 x64 and with NTFS boot disks. It is important that no dynamic disks are attached to these servers. Each server must have a fibre channel HBA for connection to the fibre channel switch and a second fibre channel HBA for connecting to the External RAID.
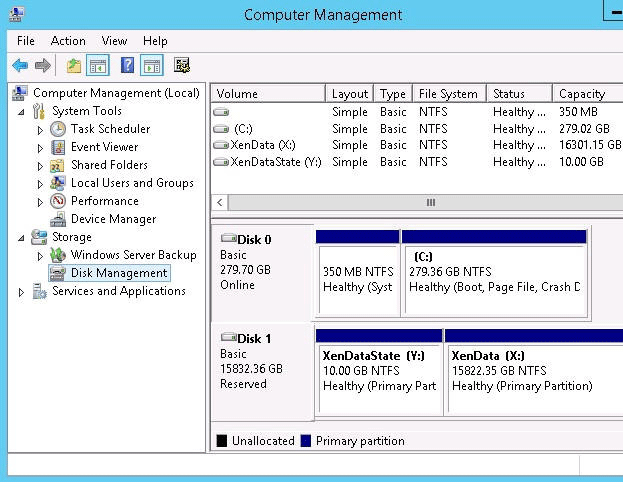
- One external RAID with fibre channel interfaces. The array must be formatted with NTFS, configured as a Windows basic disk and partitioned into two logical drives. One logical drive is for the XenData cache, termed the X: drive in this technical note, and the other is for the XenData state file, scheduler and log files. This second logical drive is termed the Y: drive in this note and it may be relatively small (10 GB). An example of the disk configuration is illustrated below.

Connect the external RAID and tape library to the servers via the fibre channel switch. Configure the switch with primary and fail-over zones. The system is illustrated below.

Server Configuration
- Power up one of the servers, leaving the other server powered off and configure the switch zoning to connect the tape library and external RAID to the powered server.p Then install the XenData X64 Edition software, configuring the X: drive as the XenData cache. By default, the XenData state file and XenData log files will be located on the boot drive.
- For the above powered server, modify the Window Registry to change the location of the XenData state file and log files as shown below:
- Key Name: HKEY_LOCAL_MACHINE\
SOFTWARE\XenData\XenData Archive Series - Value 0
Name: Scheduler Data Directory
Type: REG_SZ
Data: . << Change from . to Y:\XenData\Scheduler>> - Value 1
Name: System State File Location
Type: REG_SZ
Data: . << Change from . to Y:\XenData\State>> - Value 2
Name: Log API Errors
Type: REG_DWORD
Data: 0 - Value 3
Name: Log level
Type: REG_DWORD
Data: 0xf000ff0f - Value 4
Name: Log file directory
Type: REG_SZ
Data: \XenDataLog << Change from \XenDataLog to Y:\XenData\Log>>
- Key Name: HKEY_LOCAL_MACHINE\
- Reboot the server.
- Repeat the above procedure for the second server. (NOTE: Before switching zones, ensure that the servers are shutdown. Only ONE server should be powered on at a time. If the fibre zone is switched to a running server, the disk RAID may be corrupted).
Fail-Over Procedure
- Shutdown the primary server.
- Using the fibre channel switch management console, switch the RAID and tape library fibre channel connection from the primary zone to the fail-over zone.
- Boot the fail-over server.
- You may need to power-cycle the tape library if it reports that it is in use by another system.
Applicable Operating Systems
- Windows Server 2012 R2
- Windows Server 2016
- Windows Server 2019
Applicable XenData Software
This technical note is applicable to:
- Version 6 – Server Editions of Archive Series software
- Version 7 – Server Editions of Archive Series software including the Cloud File Gateway


