Technical Note: XTN1705
Overview
Files written by another system to a cloud object storage account managed by the Cloud File Gateway may be imported and made accessible via the gateway. The other system may be another XenData Cloud File Gateway or a third-party application. The files must be written to one or more Container Volumes created by the other system. After files in a Container Volume have been imported into the Cloud File Gateway file system, they will be read-only. The ability to import files from multiple Cloud File Gateway systems allows files to be saved to a shared object storage account by each system and accessed by them all. One mode of use is to upload files from one or more on-premise systems and to access them from one or more virtual machines (VMs) running in the cloud for analysis by programs running on the VMs.
Manual Use
After files have been uploaded to a new container by another system, they appear in the file folder interface and become read-only accessible by performing the following steps:
- Scan the object storage account for new containers
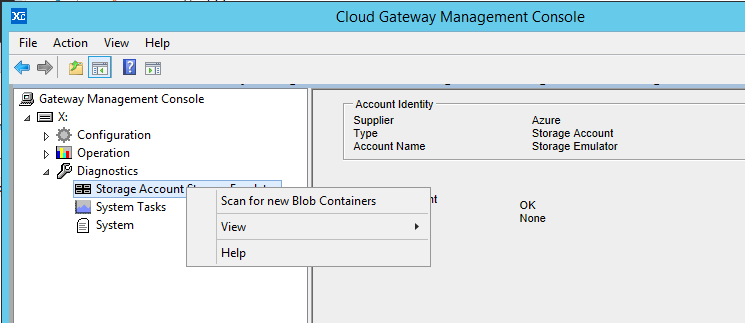
- Expand the "Diagnostics" section in the left pane of the Cloud Gateway Management Console
- Right click on the "Storage Account"
- Click on "Scan for new Blob Containers" **

- Build a contents catalog for the new container
- Expand the "Operation" section in the left pane of the Cloud Gateway Management Console
- Expand the "Volume Sets" section
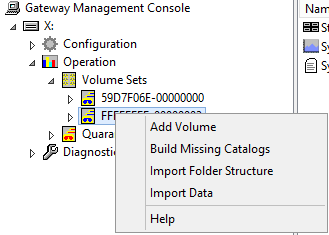
- Right click on the "Volume" to be rebuilt
- Click on "Build Missing Catalogs"

- Use Import Folder Structure or Import Data
- Expand the "Operation" section in the left pane of the Cloud Gateway Management Console
- Expand the "Volume Sets" section (you can right click here to "Import Folder Structure")
- Expand the required "Volume Set"
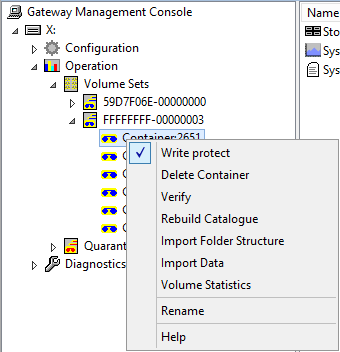
- Right click on the require Volume (or "Volume Set")
- Click on "Import Folder Structure" or "Import Data" (Note that Import Data will restore all files to the local disk cache, this can cause Azure charges and fill the available disk cache.)

Automate Use
A PowerShell script may be used to perform these steps automatically. A sample script would look like:
-
- $system = New-Object -ComObject XenData.System;
- foreach ($library in $system.Libraries) {
- $library.ScanInventory($false);
- }
- $system.FindVolumes(".*") | ForEach-Object {
- $progress = $_.RebuildCatalogue();
- $progress.Wait();
- $progress = $_.ImportCatalogue();
- $progress.Wait();
- }
This script will scan all attached Storage Accounts for new containers created by other Cloud File Gateway’s or third-party applications*, known existing Volumes, and rebuild their catalogs to import the folder structure. If you would like to limit the Volumes that the script will use, adjust the “.*” using regular expressions. For example if you would like to only include Volumes that start with FFFFFF, you can change the expression to "^(FFFFFFFF-.*-.*)$"
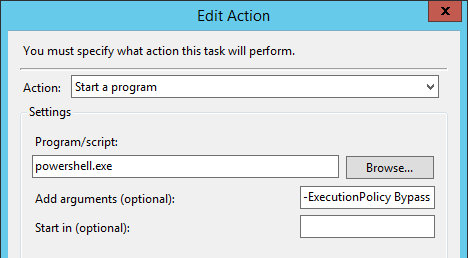
You can add the script to Task Scheduler to further automate this process. In Task Scheduler create a New Task, configuration the trigger (frequency) that you want the script to run, and to execute the script use Powershell.exe as the Program/Script and under arguments add -ExecutionPolicy Bypass “Full path to script”. This will allow the unsigned script to run on the selected schedule.

*Container Volumes created by a third-party application will be added to a Volume Set with a name starting with FFFFFFFF. If created by another instance of the Cloud File Gateway, new Container Volumes will be added to a Volume Set with the same name as the Volume Set created by the other gateway instance. If the Volume Set does not exist, it will be created automatically.
**Note that when the Cloud File Gateway starts up, for example when the computer or virtual machine reboots, it scans the object storage accounts under management and identifies any new Container Volumes avoiding the need to use the scan operation described here.


