Technical Note: XTN707
Overview
This technical note describes one method for transferring files between two archive systems located at two different sites (sites A and B). This method is intended for cases where the transferred files will be deleted from both systems after the transfer has been completed. The example described here permits file transfers in both directions between the sites.
Configuration for Transferring Files Out from Each Archive
Install the XenData archives at each site as described in the XenData Installation Guide.
For each XenData archive, create three folders at the root on the drive letter controlled by the XenData software using Windows Explorer, as illustrated below.

The archive folder will be used for the permanent local archive on each site. Policies should be configured for this folder using the XenData Management Console (XMC). An example configuration is given below which writes all files written to folder "archive" to a Volume Set called "archive".

For details on how to configure the permanent local archive, please refer to the XenData Administrator Guide. This describes how to configure disk cache retention rules, tape cartridge replication, etc. (Please remember that if using IBM LTO drives, we recommend that the Volume Set uses 8192 byte block sizes for performance reasons.)
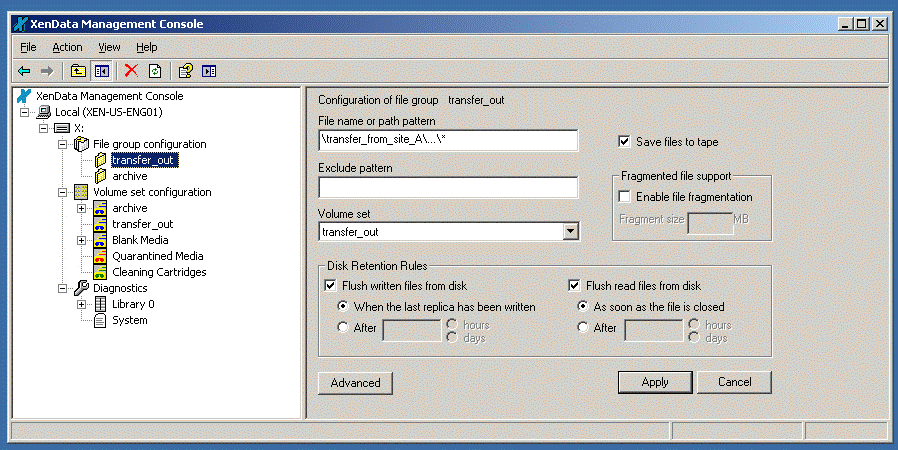
Then configure the policies for each archive system for the transfer out process. In the case of site A, this will be policies applicable to files written to the "transfer_from_site_A" folder and in the case of site B, it will be policies applicable to files written to the "transfer_from_site_B" folder. In our example, each of these folders were mapped to a Volume Set named "transfer_out" that was dedicated to transferring files to the other system. The mapping was implemented using a File Group named "transfer_out", as shown below for the archive at site A.

The disk retention rules were set to flush files as quickly as possible, as shown above. The advanced settings were changed for the transfer_out File Group from their default setting with none of the options enabled, so as to delete history for deleted files. This prevents saving unnecessary file system metadata for files that have been deleted from the transfer_out folder. This setting is illustrated below.

Procedure for Transferring Out
The procedure for transferring files from site A is given below.
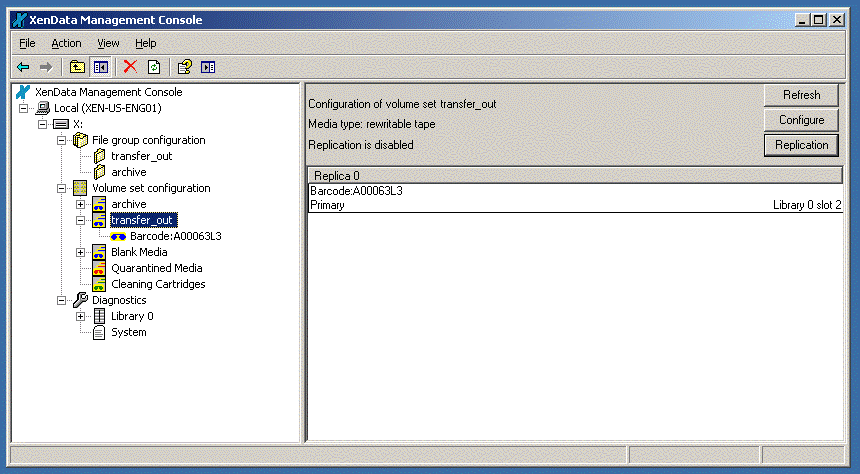
- Add a Volume to the "transfer_out" Volume Set using the XMC. This will cause the system to take a blank tape cartridge and initialize it for the "transfer_out" Volume Set. The XMC will then appear as shown below.

- Copy files (for example using Windows Explorer) to the "transfer_from_site_A" folder. Note that sub-folders maybe created under the "transfer_from_site_A" folder if required.
- After all required files have been copied, right click on the tape cartridge in the XMC and select "Finalize".
- Right click on the tape cartridge in the XMC and select "Export". Then, physically remove the tape cartridge from the tape library mail slot.
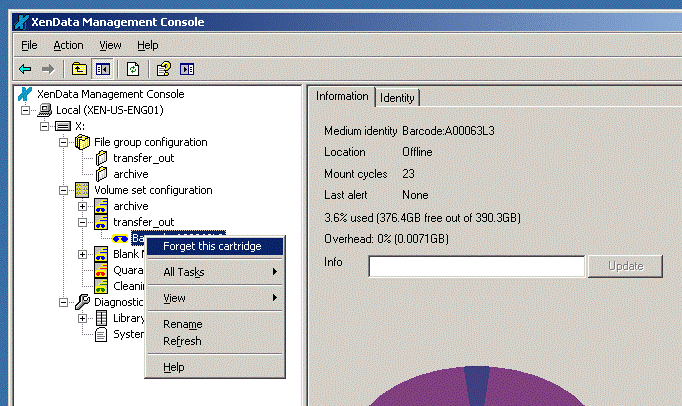
- Right click on the tape cartridge in the XMC and select "Forget this cartridge", as shown below.

- Use Windows Explorer to delete all files in the "transfer_from_site_A" folder. (Note this will result in a warning message being put into the XenData section of the Windows Event Log. The message states, “An attempt to write data to volume set transfer_out failed because there is no space available in the volume set.” This should be ignored – it is due to the system trying to write data to the tape to indicate that the files have been deleted.)
- The tape exported in step 4 above is now ready for transfer to the archive on site B and the system at site A is now ready to create another transfer tape, starting at step 1 above.
The procedure for transferring files from site B is identical, except the "transfer_from_site_B" folder must be used, not the "transfer_from_site_A" folder.
Configuration for Transferring Files in to Each Archive
The XMC must be configured for the transfer-in process when the first tape cartridge is imported from the other archive. The configuration process, described below, does not need to be repeated for subsequent tape transfers.
- Import the tape cartridge from the other archive system into the tape library. The very first time that this is performed, a Volume Set will be created that has the same global ID as the Volume Set that was used to generate it. This should be renamed "transfer_in" by right clicking on the Volume Set and selecting Rename.
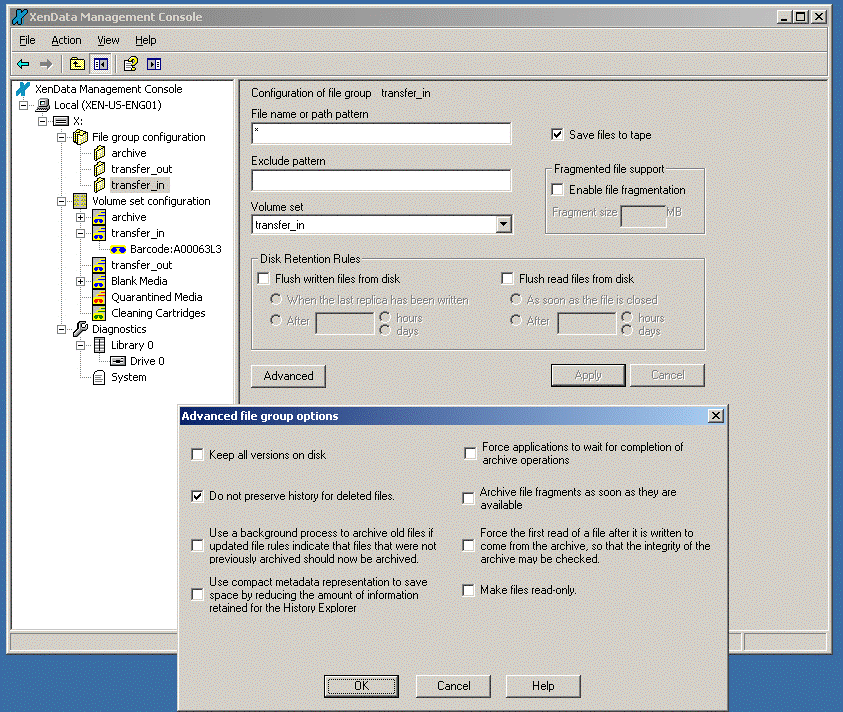
- Create a new File Group that is used to bring files online when using the Data Import function. This should be a File Group rule that applies to all files other than the permanent archive folder and the folder designated for transferring out. For example, when the first tape cartridge is transferred from site A to site B using the procedure described above, the new File Group shown below should be created.

For the configuration described in this technical note, this File Group rule will only be used by the system to define how files are imported into the system. By disabling flushing, it ensures that the Import Data function causes files to be retained on the XenData disk cache until they are deleted. Furthermore, by enabling "Do not preserver history for deleted files", it ensures that unnecessary metadata is not retained after the transferred files are deleted.
Procedure for Transferring In
- Import the tape cartridge from the other archive system into the tape library. This will automatically be assigned to the "transfer_in" Volume Set.
- Right click on the tape cartridge in the XMC and select "Import data". This will cause the tape to be scanned and the files and folders on the tape will be retained on the XenData disk cache and will come online in the archive file system.
- If the tape is to be reformatted for re-use, right click on the tape in the XMC and select reformat. Then select "quick format". The tape will be reformatted and will be displayed within the blank media group in the XMC.
- When the files are no longer required in the archive (typically after being copied from the archive file system) delete the files and folders in the archive file system. This may be performed using Windows Explorer, for example. (Note this will result in a warning message being put into the XenData section of the Windows Event Log. The message states, “An attempt to write data to volume set transfer_in failed because there is no space available in the volume set.” This can be ignored.)
Additional Notes
- If using IBM LTO tape drives, we recommend that all Volume Sets use 8192 byte block sizes for performance reasons.
- This procedure may be modified in a number of ways: the folder, File Group and Volume Set names may be changed; the method for setting up the transfer-in and transfer-out Volume Sets may be modified as described in note 3 below.
- When configuring the two archives as described above, the procedure involves working on one system, then working on the other and then back to the first system. It is possible to modify the procedure so as to only have to visit each site once. Please contact XenData Technical Support for more details.
Applicable Operating Systems
- Windows Server 2008 R2
- Windows Server 2012 R2
Applicable XenData Software
This technical note is applicable to:
- Version 5 – Server Editions of Archive Series software
- Version 6 – Server Editions of Archive Series software


