Technical Note: XTN906
Overview
All versions of XenData Archive Series software may be configured to automatically archive files to replica tape cartridges. The replica tapes store identical files, including old file versions, deleted files, delete records and rename records. In version 5 of Archive Series software, the ability to "Add a missing replica" was introduced. This functionality is useful if one of the replica tapes is lost or becomes faulty for some reason, as it allows a replica tape to be replaced.
The "Add a missing replica" functionality may also be used to convert an existing non-replicated Volume Set to a replicated Volume Set. This Technical Note explains how to implement this conversion from a non-replicated Volume Set to a replicated Volume Set with one additional replica.
There are two steps involved in implementing the conversion:
- Edit the XenDataState.xml file to convert from a non-replicated to a replicated Volume Set.
- For each Volume, use the "Add missing replica" function to produce the new replica tape.
These steps are described in detail below.
NOTE: If any file on a tape has been rearchived, the "Add Missing Replica" will fail for that tape. The tape should be rearchived or repacked first. Volume Statistics can be used to find out if the tape has any files that have been rearchived by looking in the "Rearchived fragment" row.
Editing the XenDataState.xml file
Note that the XenDataState.xml file can only be edited while the XenData Archive Series service is stopped. The system will be offline during this process.
- From Start > Administrative Tools > Services, stop the XenData Archive Series service.
- Create a backup of the XenDataState.xml found in C:WINDOWS\system32\.
- Use Notepad to open XenDataState.xml.
- Locate the Volume Set that you wish to edit within the XML file. It should have an identification number such as VolumeSet Identity="4914D3AA-00000000" followed by the name shown in the XenData Management Console such as Name="Default".
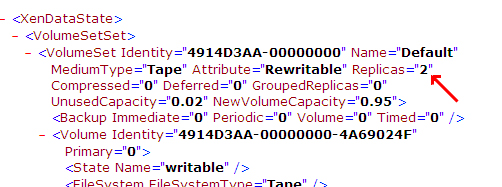
- Change the Replicas= value for this Volume Set. This is shown in the XML file after Name=, MediumType= and Attribute=. You will need to change the Replicas value from Replicas="1" to Replicas="2".
- Save and close XenDataState.xml.
- Go back to services and start the XenData Archive Series service.
This edit is illustrated below. A portion of the XenDataState.xml file is shown using the example described above. The only change to the xml file is to change the Replicas= value from "1" to "2".

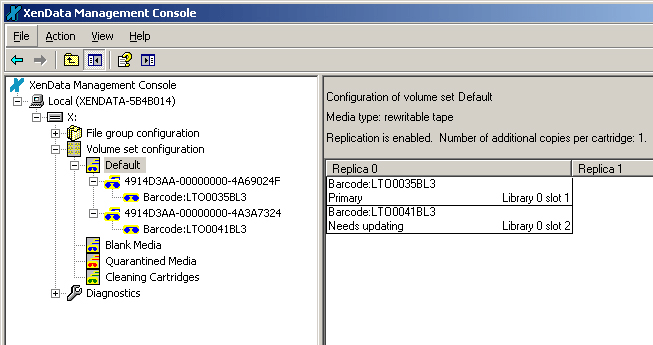
After successfully making this change, the Volume Set will be identified in the XenData Management Console as replicated but with missing replicas. By clicking on the applicable Volume Set in the left pane of the XenData Management Console, the Volume Set information will be displayed as follows:

Adding Replica Tapes
The selected Volume Set is now configured with replication enabled. However, the replicas will have to be added manually for each Volume using the "Add missing replicas" function.
- Open the XenData Management Console.
- In the left pane, click on your newly replicated Volume Set. You now should see a Replica 0 and a Replica 1 column. All the existing tapes are in the Replica 0 column. You will also notice that you see a volume identity instead of tape barcode in the tree shown in the left pane. If you expand the Volume, you will see the existing tape and its barcode.
- Click on the Replication button. Set a replication schedule that best suits your needs and the capabilities of your tape library.
- Make sure there is at least one blank tape of the required capacity in the blank media set.
- Select a Volume for which you wish to create a replica and right-click on the volume ID. Select "Add missing replica".
- After the tape is added to the Volume, it needs to be updated. Right-click on the new replica tape in the left pane and select "Update now".
- Repeat for the rest of the Volumes that you wish to replicate.
Reverting Back to a Non-Replicated Volume Set
It is possible to revert back to a non-replicated Volume Set. To do this, export the replicas that were created and click "Forget this cartridge" for each one. Stop the XenData Archive Series service, edit the XenDataState.xml file back to show Replicas="1". Restart the service.
Applicability
This procedure is applicable to Volume Sets created by any version of XenData Archive Series software. However, the software must be updated to Version 5.00 or later to implement the procedure.


