- First connect the mTape LTO drive to the X1 using a Thunderbolt cable. You may use either of the Thunderbolt ports at the rear of the mTape unit. Then power on the LTO drive and wait until the green light on the front of the drive turns solid green and, only then, turn on the X1 by depressing the power button on the front of the unit. Then login to the X1.
LTO Drive Installation Instructions for mTape Thunderbolt 3 Drives from mLogic
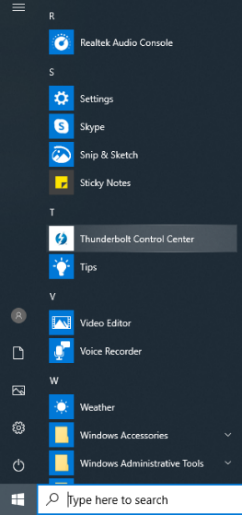
- Click on the Start icon. Then scroll to and click on the Thunderbolt Control Center, as illustrated below.

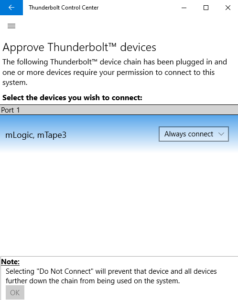
The mLogic, mTape 3 device should appear as illustrated below. Select it and ‘Always Connect’ from the drop-down menu.

Then reboot the X1.
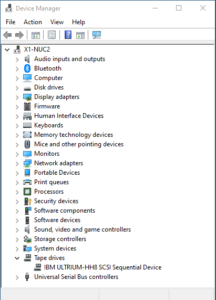
- Right-click on the Start icon and select Device Manager. Normally the LTO device drive will have been installed automatically. You should check the Device Manager listing to ensure that this is the case. If so, the LTO drive will appear under tape drives as shown below.

If the LTO device driver has not been installed automatically, it may appear in the "Other Devices" section of Device Manager. The procedure to install or update the device driver is as follows. Right-click on the drive in the Device Manager listing and in the menu select options, click "Update Driver". Click on "Browse my computer for driver software" and then “Let me pick from a list of compatible drivers on my computer”. In the Manufacturer list select "LTO" and apply the standard LTO tape driver provided by Windows in the right-hand pane. If a warning is displayed, select "Yes" to continue. Close the dialog box and check that the drive is now displayed in the "Tape Drive" section of the Device Manager.
- Then use the XenData hardware configuration utility to recognize the LTO drive as described in the X1 Installation and User Guide.


