Technical Note: XTN1205
Procedure
- Download the "XenData Server Installation Guide", which is available from the support section of the website.
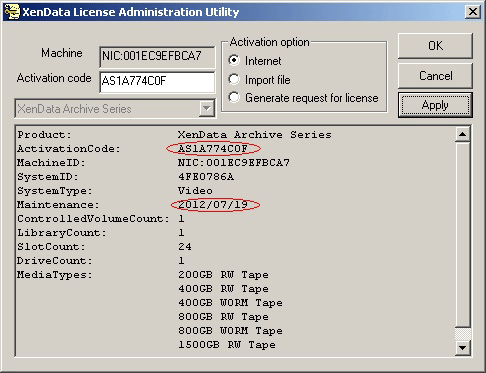
- Open the XenData License Administration utility from the Start > Programs > XenData menu. Confirm that you have current software maintenance and note your Activation Codes. It is essential that you had software maintenance in place on the release date of the new software, otherwise the XenData Service will not start. You will need the Activation Codes for both the Archive Series software and the Alert Module during the upgrade process.

- Contact XenData Support to allow them to ensure that all files that should have been written to tape have been written to tape. (Files that should have been written to tape, but the writing process failed in the past perhaps due to a hardware failure, will still be on disk. It is important to identify whether any such files exist and to then write these to tape.) They will also discuss the options for saving and restoring any "non save to tape" data on the XenData volume.
- Once XenData support confirms that you can continue your upgrade, take a full metadata backup including the statefile using the Metadata Backup Utility. This should be stored on a USB flash drive or on another computer.
- With the XenData Service stopped, make a backup of the $XenDataData directory and its contents. This is a hidden directory at the root of the XenData disk volume. Once again this should be stored on another computer or a USB flash drive. This completes everything that you need from the old system. The old server can be shutdown.
- The new server should be prepared as described in the "Installation Prerequisites" section of the "XenData Server Installation Guide".
- Connect the tape hardware to the new server. Ensure that it is powered on and has completed its initialisation, now power up the new server.
- On the new server, restore the previously backed up $XenDataData directory and its contents to the root of the new XenData Disk Volume.
- Install the XenData software as described in the "XenData Server Installation Guide". These are: 1. Install the software including reboot, 2. Install appropriate device drivers, 3. License the software and 4. Run the Hardware Configuration utility if necessary. Do NOT reboot after step 4.
- Using the Metadata Backup utility, and the metadata backup saved earlier restore ONLY the Statefile.
- Reboot the server to complete the installation of XenData Server. If the system does not start as expected, please refer to any messages in the Windows XenData Event log.
Notes
- If upgrading to Windows Server 2016 or later, you will need to disable "Show pop-up descriptions for folders and desktop items" in Windows explorer, as it can cause unwanted restores when explorer tries to access file information. This setting can be found in Windows Explorer "File" > "Folder Options" > "View". Uncheck the box, and select "Apply To Folders" to apply this to all folders.
Related Technical Information
Applicable Operating Systems
- Windows Server 2012 R2
- Windows Server 2016
- Windows Server 2019
Applicable XenData Software
This technical note is applicable to:
- Version 6 – Server Editions of Archive Series software
- Version 7 – Server Editions of Archive Series software including the Cloud File Gateway


